Self Hosting an Edge WAF for your Homelab
When you’re running public-facing services from your homelab, security becomes a concern. While services like Cloudflare offer excellent protection, they don’t align with the fully self-hosted vision for my homelab. In this post, I’ll walk through setting up your own edge WAF using a VPS, Wireguard, Traefik, and CrowdSec.
Why not Cloudflare?
Let me start by saying that Cloudflare is excellent. I’ve used it professionally for years, and there’s a good reason most of the internet runs through it. However, it felt wrong putting it in front of my homelab for a few reasons:
- Self-hosting philosophy: My homelab is a project in self-hosting and managing infrastructure without relying on managed services
- Terms of Service concerns: Plex and Jellyfin serve almost exclusively video content, which violates Cloudflare’s ToS for their free tier
While I doubt my measly gigabytes served per month would get noticed, these reasons were enough for me to explore alternatives.
Prerequisites
This guide assumes you have:
- A homelab with a load balancer (I use Traefik) and HTTPS already configured
- Both public and private services with appropriate network segmentation
- Basic familiarity with Docker, networking, and Linux administration
- A domain name with DNS you can modify
Requirements
Here’s what I wanted from my WAF solution:
- IP masking: Hide my real IP while providing static IPs for DNS records
- Private connectivity: Use tunnels instead of opening ports 80/443 on my home firewall
- WAF features: Application security, rate limiting, geo-blocking, and a second line of defense
- Monitoring: Alerting on security events and traffic anomalies
- Visibility: Dashboard to view traffic patterns, hosts, and endpoints
Technology Stack
Here’s what we’ll be using:
- OPNsense: Firewall handling the Wireguard tunnel and routing
- Docker: Containerization for all services
- Wireguard: Secure tunnel between VPS and homelab
- Traefik: Edge proxy with middleware support
- CrowdSec: Community-driven security engine
- Prometheus/Grafana: Metrics and visualization (covered in a future post)
Architecture Overview
Before diving into the setup, here’s how traffic will flow:
- User requests hit your VPS’s public IP
- Traefik on the VPS applies WAF rules and security checks
- Valid traffic is forwarded through the Wireguard tunnel
- Your homelab’s load balancer receives the request over the private tunnel
- Response travels back through the same path
Setup Guide
Part 1: Configure Wireguard on OPNsense
Note: This assumes you can port forward 51820. If you’re behind CG-NAT, you’ll need to initiate the tunnel from the VPS side instead.
First, install the wireguard-kmod package on OPNsense.
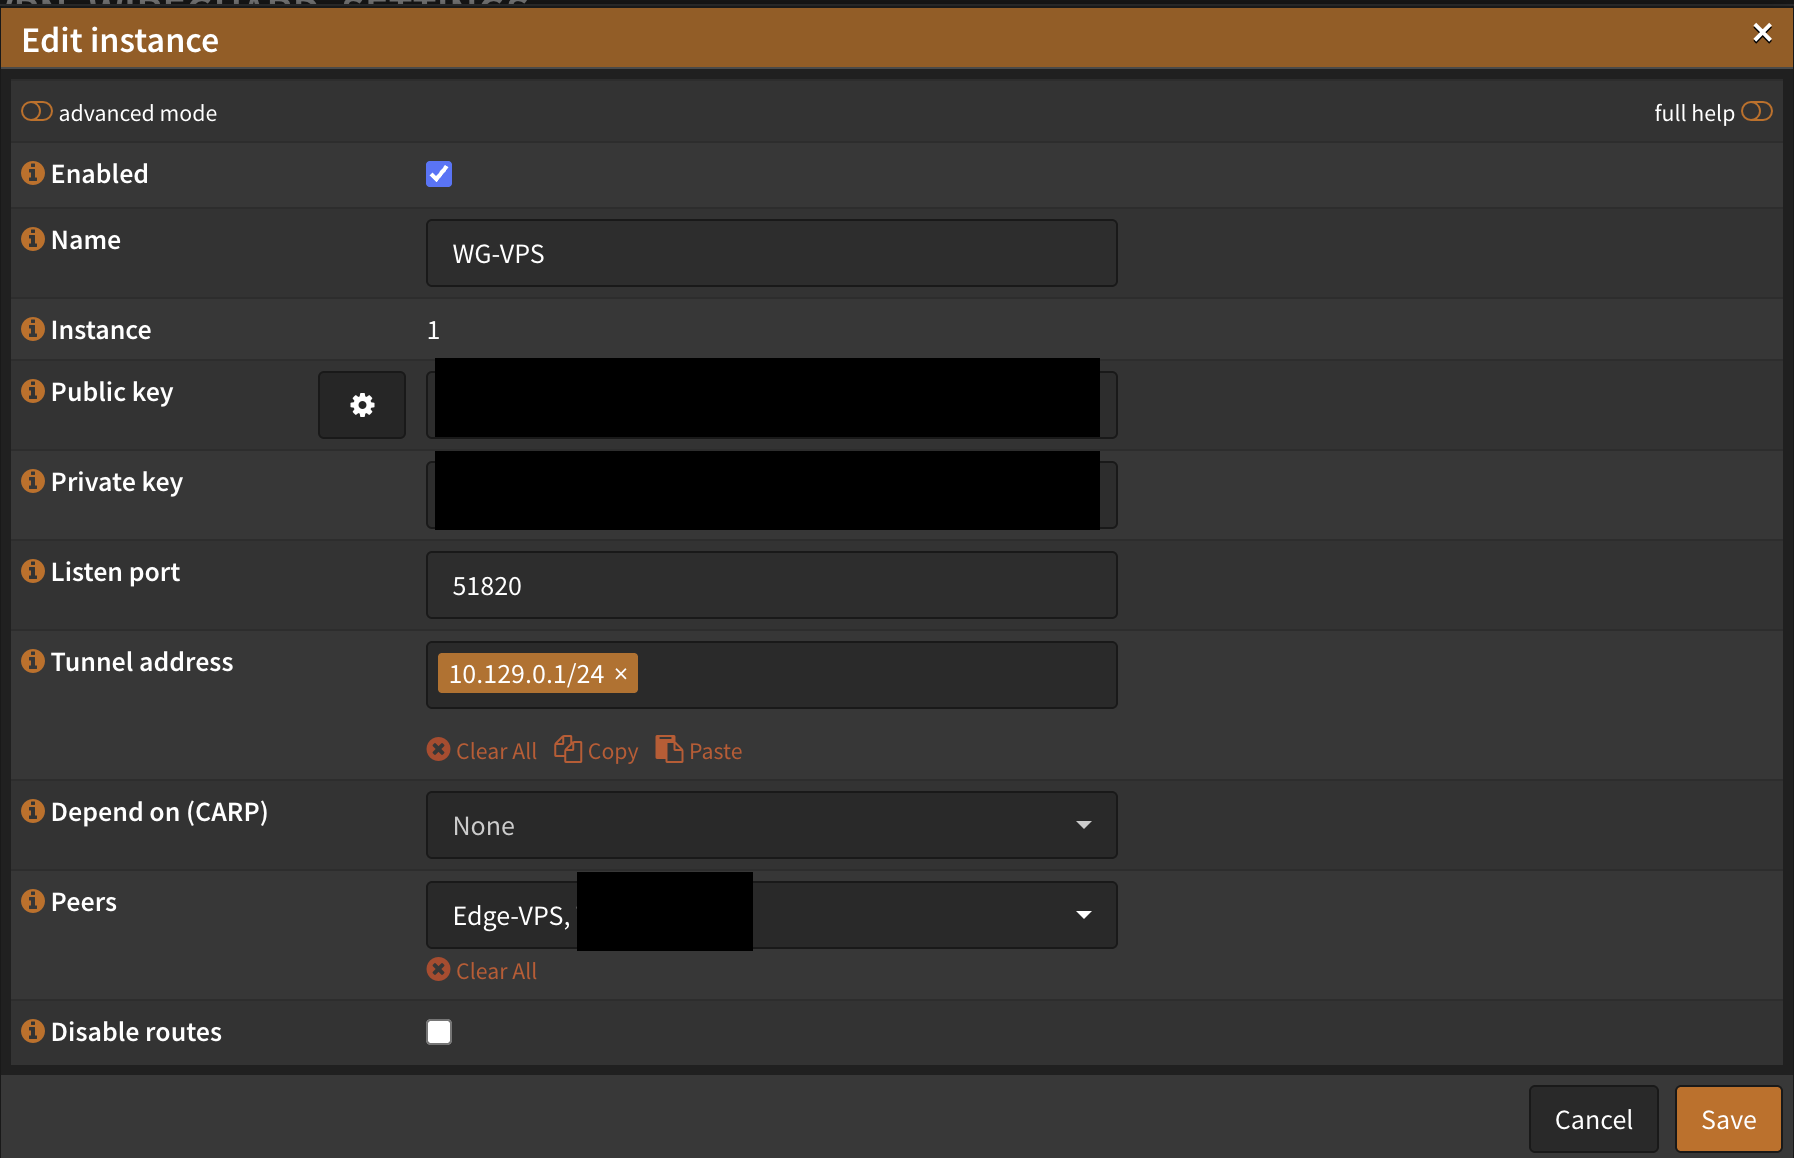
Navigate to VPN → WireGuard → Settings and create a new instance:
- Name: WG-VPS
- Port: 51820 (or your preference)
- Tunnel Address: 10.129.0.1/24 (use a subnet separate from your main VLANs)
Generate a keypair and save the configuration.
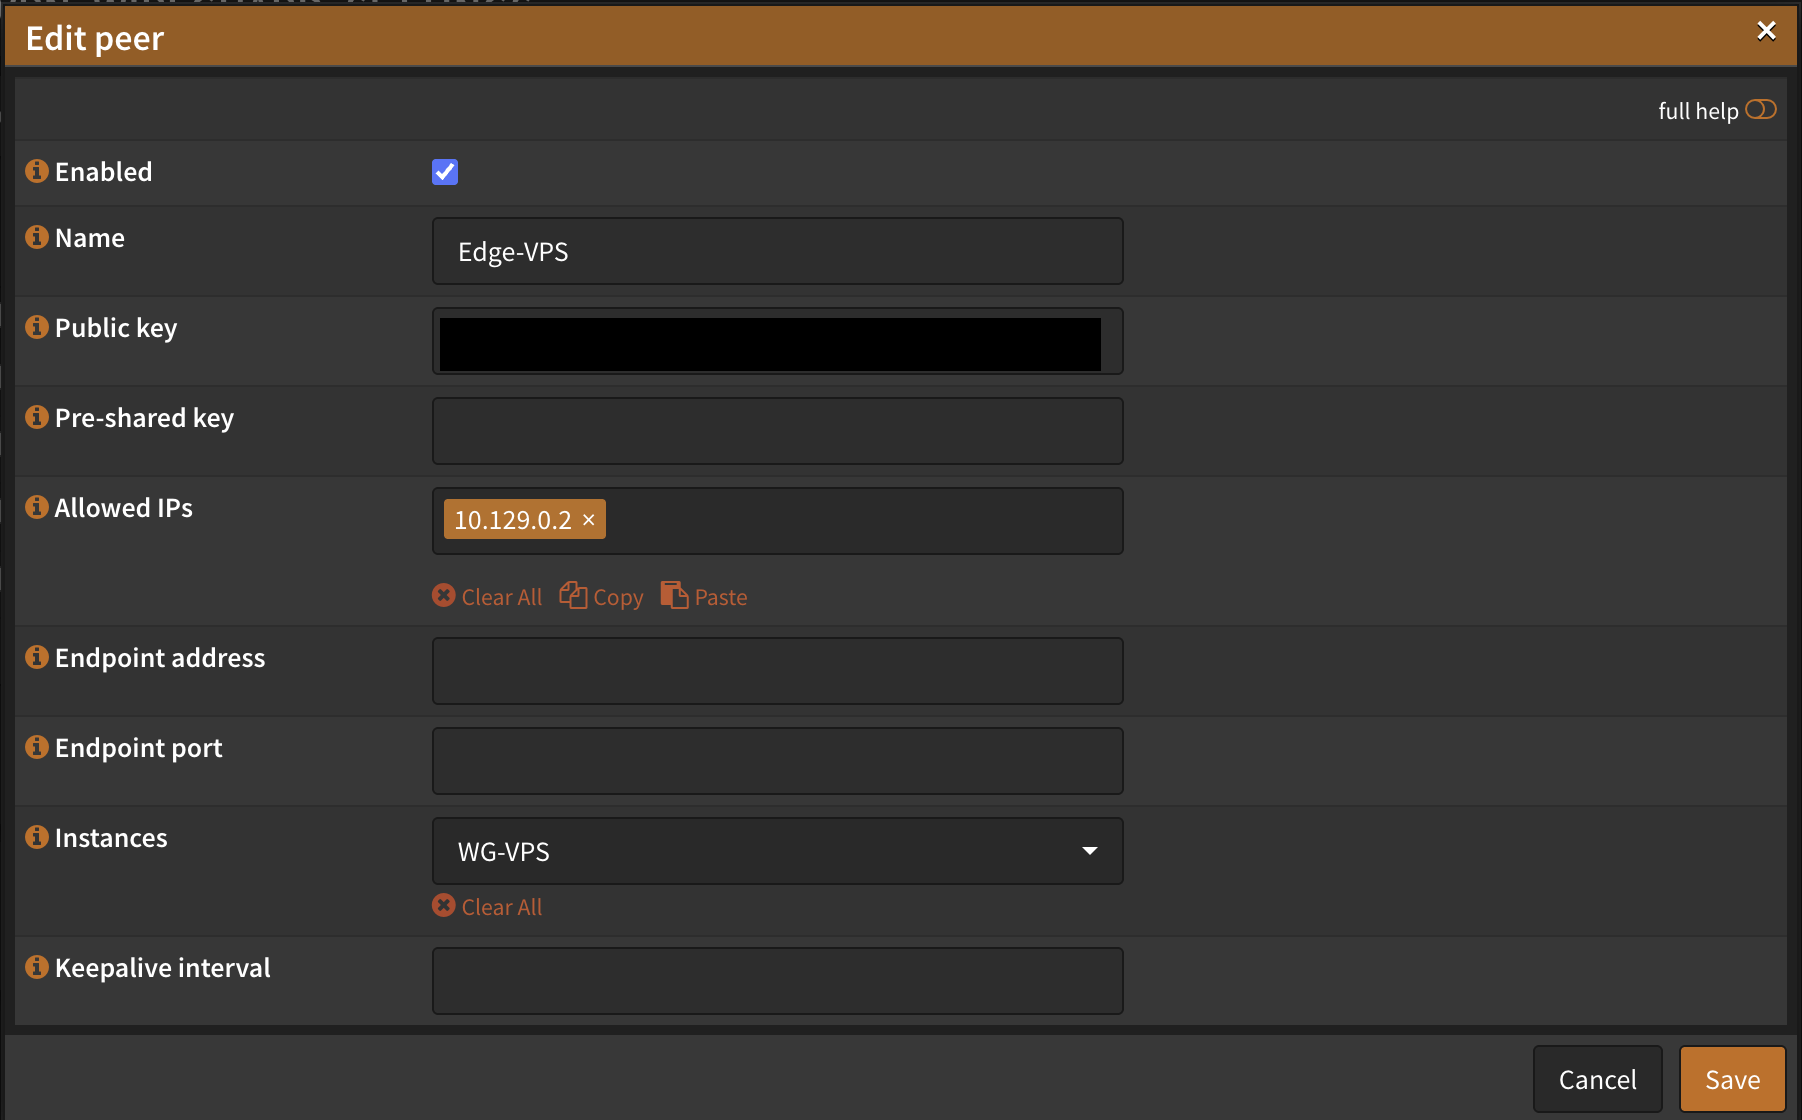
Next, create a peer:
- Name: Edge-VPS
- Allowed IPs: 10.129.0.2
- Instance: WG-VPS
- Public Key: (leave blank for now, we’ll add it after VPS setup)
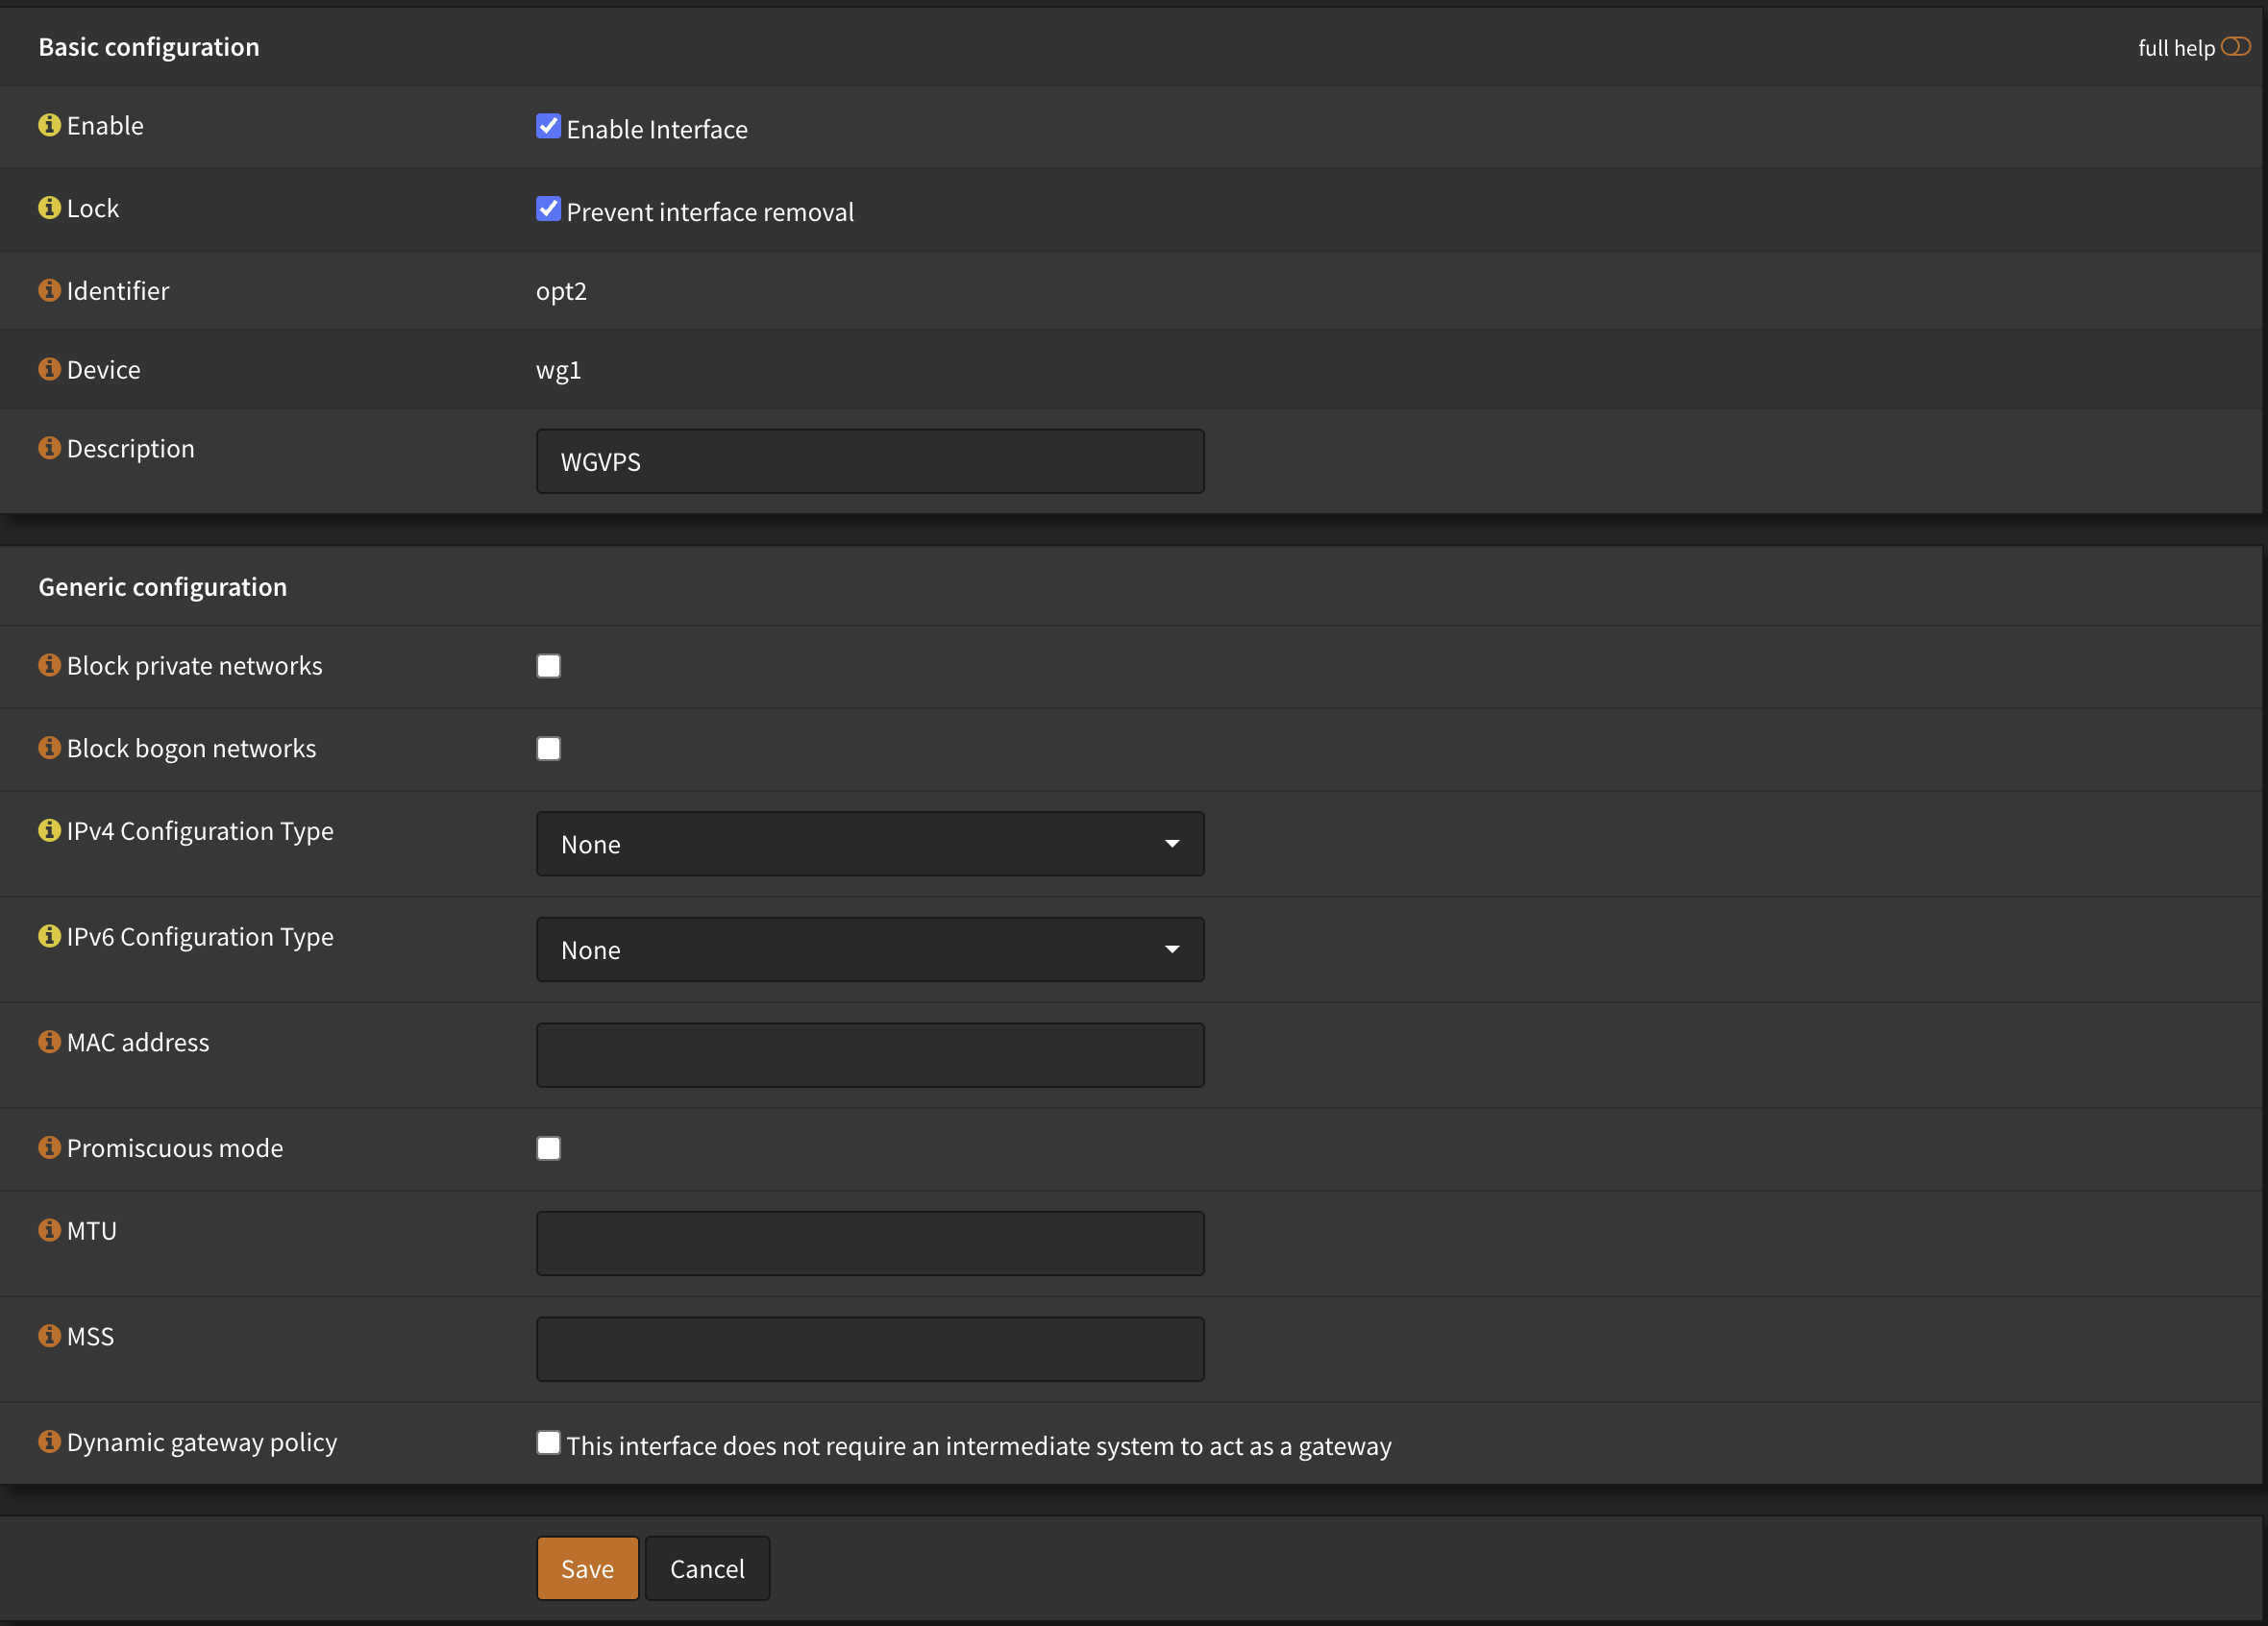
Assign the interface under Interfaces → Assignments:
- Enable the WGVPS interface
- Check “Prevent interface removal” if desired
- Keep other settings default
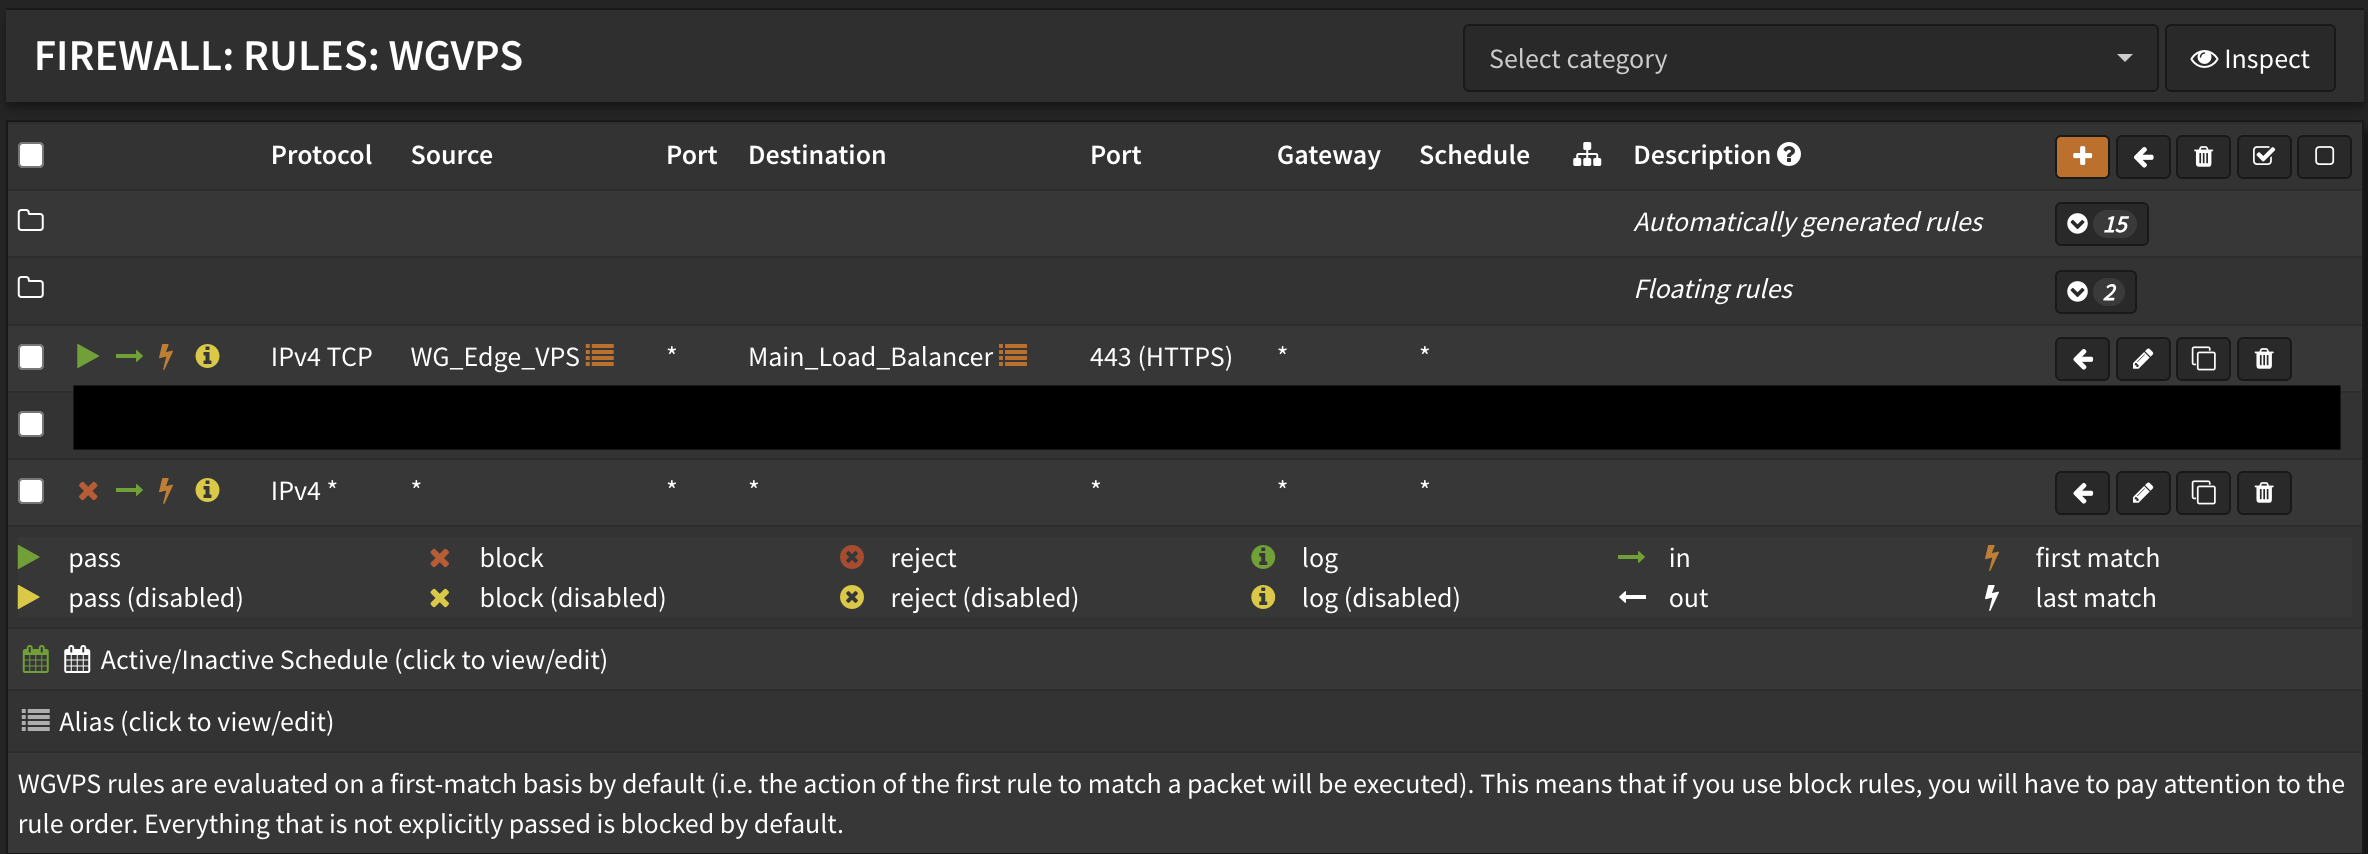
Configure firewall rules under Firewall → Rules → WGVPS:
- Create a default deny rule (important!)
- Add a rule allowing
10.129.0.2to reach your homelab load balancer on port 443 - Add any additional rules for services the VPS needs to access
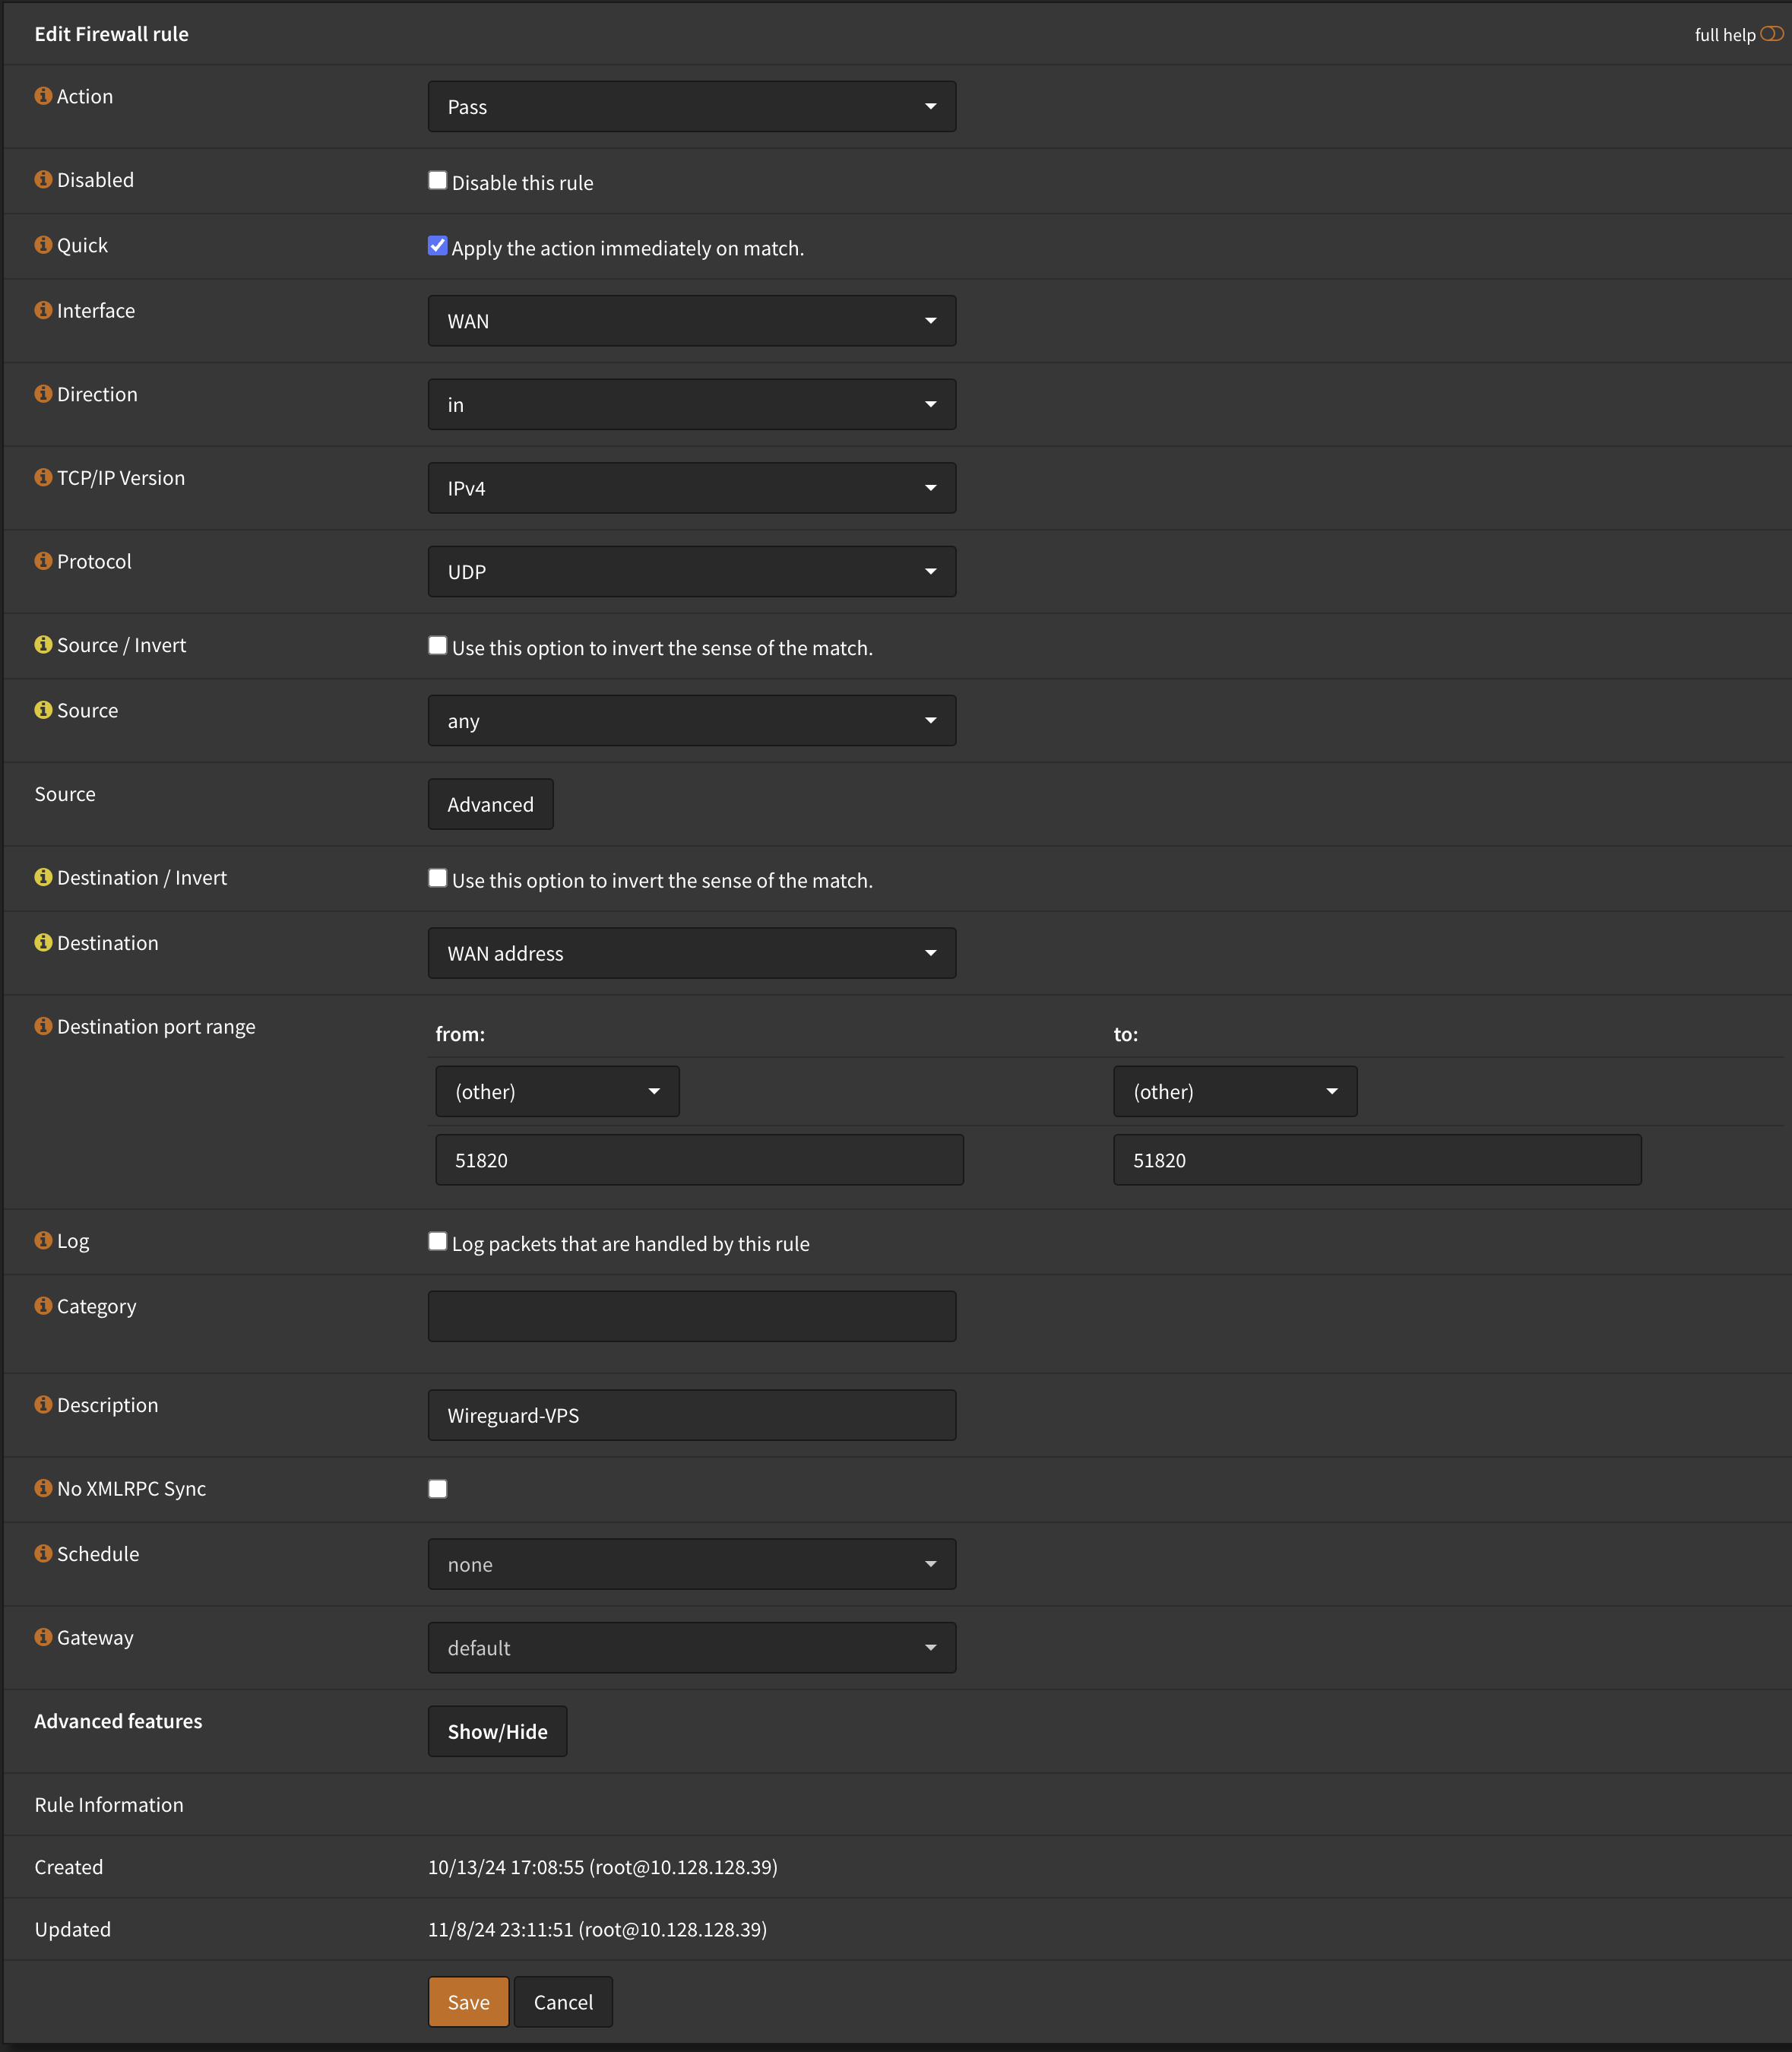
And finally, go to your WAN interface and create a new rule, allowing traffic in on port 51820 over UDP.
That’s the OPNsense configuration done for now.
Part 2: VPS Selection and Initial Setup
I needed a VPS with:
- Unmetered or high bandwidth (4+ TB/month)
- At least 1 gbps speed
- Geographic proximity to my homelab (North Eastern NA)
- Cheap
I chose BuyVM - $3.50/month for 1 core, 1GB RAM, and unmetered bandwidth in New York. Netcup was my runner-up with 2.5 Gbps speeds and better specs for €5.75/month.
Initial Server Configuration
VPS bought, let’s set it up. I use Debian for all my servers, so the commands will assume that.
Update the system:
sudo apt update && sudo apt dist-upgrade -y
Install Docker:
# Add Docker's official GPG key
sudo apt-get update
sudo apt-get install ca-certificates curl
sudo install -m 0755 -d /etc/apt/keyrings
sudo curl -fsSL https://download.docker.com/linux/debian/gpg -o /etc/apt/keyrings/docker.asc
sudo chmod a+r /etc/apt/keyrings/docker.asc

# Add repository to apt sources
echo \
  "deb [arch=$(dpkg --print-architecture) signed-by=/etc/apt/keyrings/docker.asc] https://download.docker.com/linux/debian \
  $(. /etc/os-release && echo "$VERSION_CODENAME") stable" | \
  sudo tee /etc/apt/sources.list.d/docker.list > /dev/null

# Install Docker
sudo apt-get update
sudo apt-get install docker-ce docker-ce-cli containerd.io docker-buildx-plugin docker-compose-plugin
Install Wireguard
sudo apt install wireguard
I prefer to install this natively instead of through Docker since it’s how I will be primarily connecting to the VPS, so I don’t want my SSH tunnel to go down if I have to mess with Docker.
Configure UFW Firewall
BuyVM doesn’t have any external firewall, so it has to be managed through the host itself.
sudo apt install ufw
sudo ufw allow ssh
sudo ufw allow 80/tcp
sudo ufw allow 443/tcp
sudo ufw allow from 10.128.0.0/16  # This allows my home subnet to talk to any port
sudo ufw enable
sudo ufw status
Harden SSH
Standard SSH hardening. From a terminal on your computer:
ssh-copy-id user@VPS_IP
Back on the VPS, edit /etc/ssh/sshd_config:
PasswordAuthentication no
PermitRootLogin no
Restart SSH:
sudo systemctl restart sshd
Part 3: Configure Wireguard on VPS
Generate keypair:
wg genkey | tee private.key | wg pubkey > public.key
Important: Copy the public key and add it to your OPNsense peer configuration now.
Create /etc/wireguard/wg0.conf:
[Interface]
PrivateKey = <GENERATED_PRIVATE_KEY>
Address = 10.129.0.2/32 # Must match peer address in OPNSense
# DNS = <Optional, put your DNS server here if you run one and want to use your internal DNS. Update OPNSense firewall rules as necessary>

[Peer]
PublicKey = <OPNSENSE_INSTANCE_PUBKEY>
AllowedIPs = <ALLOWED_IPS>
Endpoint = <HOMELAB IP/DDNS HOSTNAME>
For AllowedIPs, this is a list of all IPs that the VPS will be able to communicate with. This involves responding to requests too, not just initiating them. Rules are managed through OPNSense, so I put my entire home IP range here - 10.128.0.0/16
Enable and start Wireguard:
sudo systemctl enable wg-quick@wg0
sudo systemctl start wg-quick@wg0
Test connectivity:
# Test tunnel
ping 10.129.0.1

# Test access to homelab load balancer
curl -k https://10.128.10.11
If that works, you can now connect to your VPS via tunnel IP: ssh <user>@10.129.0.2
Part 4: Deploy Traefik
Create the directory structure:
mkdir -p ~/docker-compose/config/traefik
cd ~/docker-compose
Create docker-compose.yaml:
version: '3.8'

services:
  traefik:
    image: "traefik:latest"
    container_name: "traefik"
    restart: unless-stopped

    environment:
      CF_DNS_API_TOKEN: "<YOUR CF TOKEN>"

    ports:
      - "80:80"   # HTTP
      - "443:443" # HTTPS
      - "8082:8082" # Optional: Metrics, if setting up Prometheus later
      - "8080:8080" # Optional: Traefik Dashboard/API

    volumes:
      - ./config/traefik:/etc/traefik
This assumes you use Cloudflare for DNS, and the token is required for DNS challenges to provision the HTTPS certificate.
Next our config files. We’ll do two config files for Traefik: One static config that defines entrypoints and providers, and a dynamic file provider where we define our middleware, endpoints, etc.
Create ./config/traefik/traefik.yml:
# -- Global Settings --
global:
  checkNewVersion: true
  sendAnonymousUsage: false

# -- Log Settings --
# accessLog must be enabled for crowdsec to work.
log:
  level: INFO
accessLog:
  format: "json"


# -- Plugins --
# Plugins for additional WAF functionality.
# Uncomment later
# experimental:
#   plugins:
#     crowdsec-bouncer:
#       moduleName: github.com/maxlerebourg/crowdsec-bouncer-traefik-plugin
#       version: "v1.4.2"
#     geoblock:
#       moduleName: "github.com/PascalMinder/geoblock"
#       version: "v0.3.3"

# -- Metrics --
metrics:
  prometheus:
    addRoutersLabels: true
    entryPoint: metrics


# -- API and Dashboard --
api:
  dashboard: true
  insecure: true # This will make the dashboard publicly accessible on port 8080. Make sure your firewall rules are in place.

# Set insecureSkipVerify to true so we can use HTTPS for the backend
serversTransport:
  insecureSkipVerify: true

# -- EntryPoints --
entryPoints:
  web:
   address: ":80"
   # -- HTTP to HTTPS Redirection --
   http:
     redirections:
      entryPoint:
        to: websecure
        scheme: https
        permanent: true

  websecure:
    address: ":443"
    # -- Default TLS Configuration --
    # This configures TLS for the entrypoint, using the specified certResolver
    # and requesting certificates for the defined domains.
    http:
      tls:
        certResolver: cloudflareResolver # Use the Cloudflare resolver defined below
        domains:
          - main: "<YOUR_DOMAIN.tld>"
            sans:
              - "*<YOUR_DOMAIN.tld>"

  # -- Metrics endpoint --
  # Optional, remove if not setting up Prometheus
  metrics:
    address: ":8082"

# -- Providers --
providers:
  # -- File Provider --
  file:
    filename: "/etc/traefik/dynamic_conf.yml"
    watch: true

# -- Certificate Resolvers --
certificatesResolvers:
  cloudflareResolver: # A name of your choice for the resolver
    acme:
      email: "<YOUR EMAIL>"
      storage: "/etc/traefik/acme.json" # Path to store ACME certificates
      dnsChallenge:
        provider: "cloudflare"
        resolvers: # Optional: Custom DNS servers to use for the ACME challenge.
         - "1.1.1.1:53"
         - "8.8.8.8:53"
Read this over and fill in your domain and email. Tweak options as desired. The plugins block is commented out for the time being.
Create ./config/traefik/dynamic_conf.yml:
http:
  # -- Routers --
  # Routers define how incoming requests are matched and processed.
  routers:
    # -- Example --
    example-router:
      rule: "Host(`example.port8080.sh`)"
      service: home-lb
      entryPoints:
        - websecure
      middlewares:
        - commonRateLimit
        # - crowdsec
        # - geoblock
      tls: {}


  # -- Services --
  # Define your endpoin
  services:
    home-lb:
      loadBalancer:
        servers:
          - url: "https://<YOUR_LB_IP>"
            scheme: HTTPS

  # -- Middlewares --
  middlewares:
    commonRateLimit:
      ratelimit:
        average: 20 # Max average requests per second
        burst: 50   # Max burst requests (short peaks)
        # period: "1s" # Optional: The period over which rates are averaged. Default is 1 second.
    # crowdsec:
    #   plugin:
    #     crowdsec-bouncer:
    #       enabled: true
    #       crowdseclapikey: <REDACTED>
    #       crowdsecAppsecEnabled: true
    #       crowdsecAppsecHost: crowdsec:7422
    #       crowdsecAppsecFailureBlock: true
    #       crowdsecAppsecUnreachableBlock: true
    # geoblock:
    #   plugin:
    #     geoblock:
    #         silentStartUp: false
    #         allowLocalRequests: true
    #         logLocalRequests: false
    #         logAllowedRequests: false
    #         logApiRequests: false
    #         api: "https://get.geojs.io/v1/ip/country/{ip}"
    #         apiTimeoutMs: 750                                 # optional
    #         cacheSize: 15
    #         forceMonthlyUpdate: true
    #         allowUnknownCountries: false
    #         unknownCountryApiResponse: "nil"
    #         blackListMode: false
    #         addCountryHeader: false
    #         countries:
    #             - AD # Andorra
    #             - AU # Australia
    #             - AT # Austria
    #             - CA # Canada
    #             - HR # Croatia
    #             - CY # Cyprus
    #             - CZ # Czechia
    #             - DK # Denmark
    #             - FI # Finland
    #             - FR # France
    #             - DE # Germany
    #             - GI # Gibraltar
    #             - GR # Greece
    #             - GL # Greenland
    #             - VA # Holy See (the)
    #             - HU # Hungary
    #             - IS # Iceland
    #             - IE # Ireland
    #             - IM # Isle of Man
    #             - IT # Italy
    #             - JE # Jersey
    #             - LV # Latvia
    #             - LI # Liechtenstein
    #             - LT # Lithuania
    #             - LU # Luxembourg
    #             - MD # Moldova (the Republic of)
    #             - NL # Netherlands (the)
    #             - NZ # New Zealand
    #             - NO # Norway
    #             - PL # Poland
    #             - PT # Portugal
    #             - PR # Puerto Rico
    #             - RO # Romania
    #             - SK # Slovakia
    #             - SI # Slovenia
    #             - ES # Spain
    #             - SE # Sweden
    #             - CH # Switzerland
    #             - GB # United Kingdom of Great Britain and Northern Ireland (the)
    #             - US # United States of America (the)
In this file, configure the home-lb service to point to the IP (or hostname, if you’ve configured DNS) of your primary homelab loadbalancer. Create routers as shown, each with its own Host match rule, and pointing to your service. As before, plugin functionality is commented out.
Start Traefik and verify:
docker compose up -d
docker compose logs -f traefik
Test that everything works:
curl --resolve example.port8080.sh:443:127.0.0.1 https://example.port8080.sh/
You should hit the service on your internal LB without any HTTPS errors.
Part 5: Add CrowdSec
Create directories:
mkdir -p config/crowdsec config/crowdsec-db
Register at app.crowdsec.net and get your enrollment key from Security Engines → Engines → Enroll.
Add to docker-compose.yaml:
  crowdsec:
    image: crowdsecurity/crowdsec:latest
    container_name: crowdsec
    restart: unless-stopped
    environment:
      COLLECTIONS: "crowdsecurity/traefik crowdsecurity/http-cve crowdsecurity/appsec-virtual-patching crowdsecurity/appsec-generic-rules"
    expose:
      - "8080"
      - "7422"
    volumes:
      - /var/log/crowdsec:/var/log/crowdsec:ro
      - ./config/crowdsec-db:/var/lib/crowdsec/data
      - /var/log/auth.log:/var/log/auth.log:ro
      - ./config/crowdsec:/etc/crowdsec
      - /var/run/docker.sock:/var/run/docker.sock:ro
Start CrowdSec and configure:
docker compose up -d crowdsec

# Enroll with CrowdSec console
docker exec crowdsec cscli console enroll <KEY>

# Add bouncer for Traefik
docker exec crowdsec cscli bouncers add traefik-bouncer
Save the bouncer API key that’s displayed!
Create config/crowdsec/acquis.yaml:
source: docker
container_name:
 - traefik
labels:
  type: traefik
This will set it up to read Traefik’s docker logs directly.
Create config/crowdsec/acquis.d/appsec.yaml:
appsec_config: crowdsecurity/appsec-default
labels:
    type: appsec
listen_addr: 0.0.0.0:7422
source: appsec
Restart CrowdSec and verify:
docker compose restart crowdsec
docker compose logs -f crowdsec

# Check it's working
docker exec crowdsec cscli decisions list
Part 6: Enable WAF Features
Now we enable the WAF features on Traefik.
First, uncomment the plugins section in traefik.yml and restart Traefik:
docker compose restart traefik
docker compose logs -f traefik
Verify plugins are downloaded successfully.
Next, uncomment the middleware definitions in dynamic_conf.yml:
- For
crowdsec, replace<REDACTED>with your bouncer API key - For
geoblock, adjust the countries list as needed (my list is North America, Western & Central Europe, Oceania) - Uncomment the middleware references in your routers
Traefik will automatically reload the dynamic configuration.
Test that WAF is working:
# This should return 403 from CrowdSec
curl --resolve example.port8080.sh:443:127.0.0.1 https://example.port8080.sh/.env
Part 7: Update Homelab Load Balancer
The local loadbalancer needs to trust forwarded headers from the upstream Traefik. Since I use Traefik for my local loadbalancer, add this under the HTTPS entrypoint:
    forwardedHeaders:
      trustedIPs:
        - 10.129.0.2 # Your VPS's wireguard IP
Part 8: DNS Configuration
The last step is to point your DNS records to the VPS public IP instead of your homelab directly. This ensures all external requests go through your WAF first.
Testing and Verification
Once everything is configured, verify your WAF is working:
# Test rate limiting - you should see 429 errors after the limit
for i in {1..100}; do curl https://example.port8080.sh/; done

# Test application security - should return 403
curl https://example.port8080.sh/.env

# Check CrowdSec decisions
docker exec crowdsec cscli decisions list

# Monitor logs
docker compose logs -f traefik crowdsec
Next Steps
- Set up monitoring with Prometheus and Grafana
- Set up alerting
- Create automated backups of configurations
Conclusion
You now have a self-hosted WAF protecting your homelab services! This setup provides:
- Hidden home IP address
- Geographic filtering
- Rate limiting
- Application security rules
- Community-driven threat intelligence
- No ToS limiting what you can proxy
In a future post, I’ll cover setting up monitoring with Prometheus and Grafana, plus alerting through Discord.
2351 Words
2025-06-06 09:32